Showing posts with label Hugelkultur. Show all posts

Saturday, March 23, 2013

Vertical hugelkultur & wood chips vs horizontal hugel


Here's a quick comparison of fava beans growing in a hugelkultur bed.  The beans were planted in November, about 4 months ago.
The bed pictured, just beyond the fence, is 12'x3'.  The 4' of the bed on the right was my first attempt at hugelkultur. It has mostly horizontally buried logs with no wood chips dug in. The rest of the bed was dug with vertical stumps and wood chips.
No fertilizer was used.

Notice how the fava beans grew much better and thicker in the part of the bed with wood chips and vertical stumps.


Here's a closeup of the favas in the vertical stump & woodchip part of the bed. The stalks are much sturdier and thicker here.


Here's a closeup of the favas in the mostly horizontally buried log portion of the bed.


Saturday, March 2, 2013

Burying Stumps in Sandy Soil

Here's an idea for using hugelkultur in sandy soil.
Ideally for sandy soil you'd want lots of rotten wood dug in for water retention.
However, if you only have dry (not green) unrotted wood available, you could still get benefits from hugelkultur right away.

Bury stumps, branches, split firewood, vertically in the ground about 3-4" below the soil surface.
Then plant right over the buried wood. The plant roots should grow down underneath the wood. The wood will retain a lot of water and slowly "drip" it out the bottom unto the roots, feeding them with a decomposed wood stream and any fertilizer you add (urea, urine, bloodmeal, fishmeal, ...).  This is what I observed in "stump containers".  See:
http://lowcostvegetablegarden.blogspot.com/2012/09/eggplant-stump-branch-pot-comparison.html
http://lowcostvegetablegarden.blogspot.com/2013/02/rose-hugel-pot.html


Overtime as the wood rots it should hold even more water and since it is large chunks of wood, they won't wash away deeper into the sand with rains.


My own soil is clay, so I've never tested this, but just thought about it after visiting my parents in sandy soil Florida. I would not do this in clay soil.  In clay soil, I bury the stumps about 1' under the soil surface.  The stumps wick away excess moisture without drying out the soil.  Underneath stumps in clay soil, it gets very wet.  In the 1-2 inches right underneath a stump in clay soil, I found, that roots will not grow, because it is so wet & mucky.

Saturday, February 16, 2013

Hugel hole preperation

Last year I prepared and planted cucumbers and tomatoes in 3 hugel holes with mediocre results.
Just improved/redid the holes this year using what I learned from last year's experience.

In one hole I had put in horizontally buried branches and also mixed in some leaves. It did poorly. Just adding logs into clay soil isn't enough to make a good growing bed.  So I redug this hole out. 2' deep, 2' diameter.

These were the branches I dug out.


Put in vertical stump and branches about 10" to 1' in length. Made sure I left one shovelful depth between the soil surface and the stump. This is so I can easily do a "single dig" in future years, i.e. dig in more organic matter one shovelful deep.


 Then I added wood chips and soil to fill in the hole.  Alternated 3 shovelfuls of chips, then 3 shovelfuls of dirt. This seems like a lot of wood chips, but after just one summer this clay soil absorbs all but the largest chips.


In this hugel hole last year, I just threw in a stump vertically and mixed in a little bit of leaves. The cucumber plant did very well in this hole. The vertical stump seems to wick away excess moisture will keeping the dirt just the right amount of moistness for the plants.  The stump in the ground was from last year.

Added some branches on top of the stump, just enough to keep the wood a shovel depth below the surface.


Then 3 shovelfuls wood chips, 3 shovelfuls dirt, ... After done the pile is 1 foot high. This will be ready to plant in 2 months, mid-April.


I'm really looking forward to seeing what the soil looks like at the end of the summer. This is the first time I've added so many wood chips at once.


Monday, October 22, 2012

Garden bed construction

This last summer I experimented a lot with different growing methods in my garden and in containers.
Based on the results, this fall I redid my garden beds using:

1.  Vertical hugelkultur
2.  Large quantities of wood chips dug in the soil.
In small test beds this year these 2 techniques did the best.


Just completed 4 beds, here are pictures of building one.

Dug down average of 2.5 feet. At that depth I hit a layer of pottery-like clay that would be unusable for garden soil.
This bed is 3.5 feet wide and 12' long.


Added wood scraps, from splitting wood, at the bottom.


First layer of vertical stumps, packed closely together.


Added dirt mixed in with wood chips and then put a 2nd layer of vertical stumps.


More dirt and lots of wood chips.

Added a 3rd layer of branches, partially rotted and began building retaining walls from logs and 1/2" rebar.

No pictures, but did add a 4th layer of larger branches placed horizontally on top of here.


Here are 2 completed beds, built with retaining walls.

Also made 2 other beds without retaining walls. Those ones only had 2 layers of logs, one vertical, one horizontal. So they did not raise the soil level as much.

The only cost for these beds was the rebar (~$30).  All the logs, stumps, and chips were free. Lot of digging though.  Didn't get a chance to go to the gym for the last 6 weeks :)

Roughly the top 6" or more of soil in each bed does not contain logs or branches, just dirt and wood chips.  This is to make it easy in future years to dig in more wood chips with a normal shovel if this will be needed.  The soil is very thick clay and I believe I'll need to dig in more chips in a couple years.


Thursday, July 12, 2012

Hugelkultur works, a comparison

Here's a quick visual comparison of 2 cucumber plants, Palace Kings, that were planted at the same time.  One in a hugelhole, a hole dug about 1.5' deep and wide and then layered up with horizontal branches.  The other in just regular garden soil.  Pictures taken today.

Palace King in a hugelhole.  ~3.5' tall with baby cukes.

Palace King in regular garden, clay, soil.  ~2' tall with blossoms only.

Vertical Hugelkultur eliminates wilt


Vertical hugelkultur helps or eliminates wilting!

This has been a very exciting observation for me.

Here's the background:

I plant about 6 container tubs every year with eggplants and peppers.  Every year I try some different potting mix or technique to see what will work best.  This year after preparing the garden beds in the ground with hugelkultur, I thought why not, lets try it in the containers too.

In 2 containers, I layered up branches horizontally. But in 1 container, on a total lark, I just put in a big stump.  The potting soil used as just last year's mix, basically compost.


Eggplants were planted in the vertical "stumppot" and in one of the horizontal "branchpots".
(Peppers went into the other "branchpot").

These were planted with store bought seedlings in mid-April when the weather was still mild.
The stump was so high I had to place the eggplant seedlings directly on the stump and then put soil around it.

 The eggplant stumppot is front center.  The eggplant branchpot is front right.


Notice on this hot day, mid-May the stumppot eggplants are quite perky. They've never wilted, not ever.


Notice the branchpot eggplants, same day, same time. They drooped and wilted in the sun and heat.


Fast forward to July 10, 2012. Both eggplant pots are doing well and neither now wilts on hot days (95 degrees on this deck). I had to shade the entire settup for about a month after planting on hot days to prevent the wilting plants from being burned. This unnecessarily held back the stumppot eggplant, so I would expect it to be bigger if it hadn't been shaded.  It took about 2+ months before the branchpot eggplant stopped wilting on hot days.  (All the peppers still wilt on hot days, but that's another post and quite interesting.)


The natural conclusion from this is that the roots spread out along the stump and are able to suck up a lot of water when they need it. AND the stump wicks away excess water so there is enough aeration.

Wood only wicks with the grain.  You can test this yourself by putting a branch or 2x4 in a tub with 1" of water.  It won't wick up at all if layed horizontally.  But vertically with the grain it will wick up about 2" high.

Unexpectedly, I observed this in my ground garden also.  In addition to the 3 hugelkultur beds, I made three small 1.5' diameter planting holes that I put logs in.  For 2 of the "hugelholes" I layered horizontal branches again.  In the last hole, I was very tired and just threw a stump into it vertically and covered it up.  The hole was about 1 to 1.5' deep. The stump was about 6-8" high and had about 6" of dirt on top of it. The hole was level to the ground after finishing.  I planted cucumber seeds there.
And these cucumbers never wilted!  (As long as it was kept watered). Yet the other cukes and squash in hugelbeds/holes or in just regular ground do wilt.  

Here's the cukes in the "stumphole" on hot June 20th.  Seeds planted around mid to late April.
These cukes don't wilt.  Notice also the yellow-tinted leaves, indicating nitrogen lack.

Here are some wilting cukes on June 20th, planted at the same time.  Notice how they are much smaller also, since they don't photosynthesize when wilting.

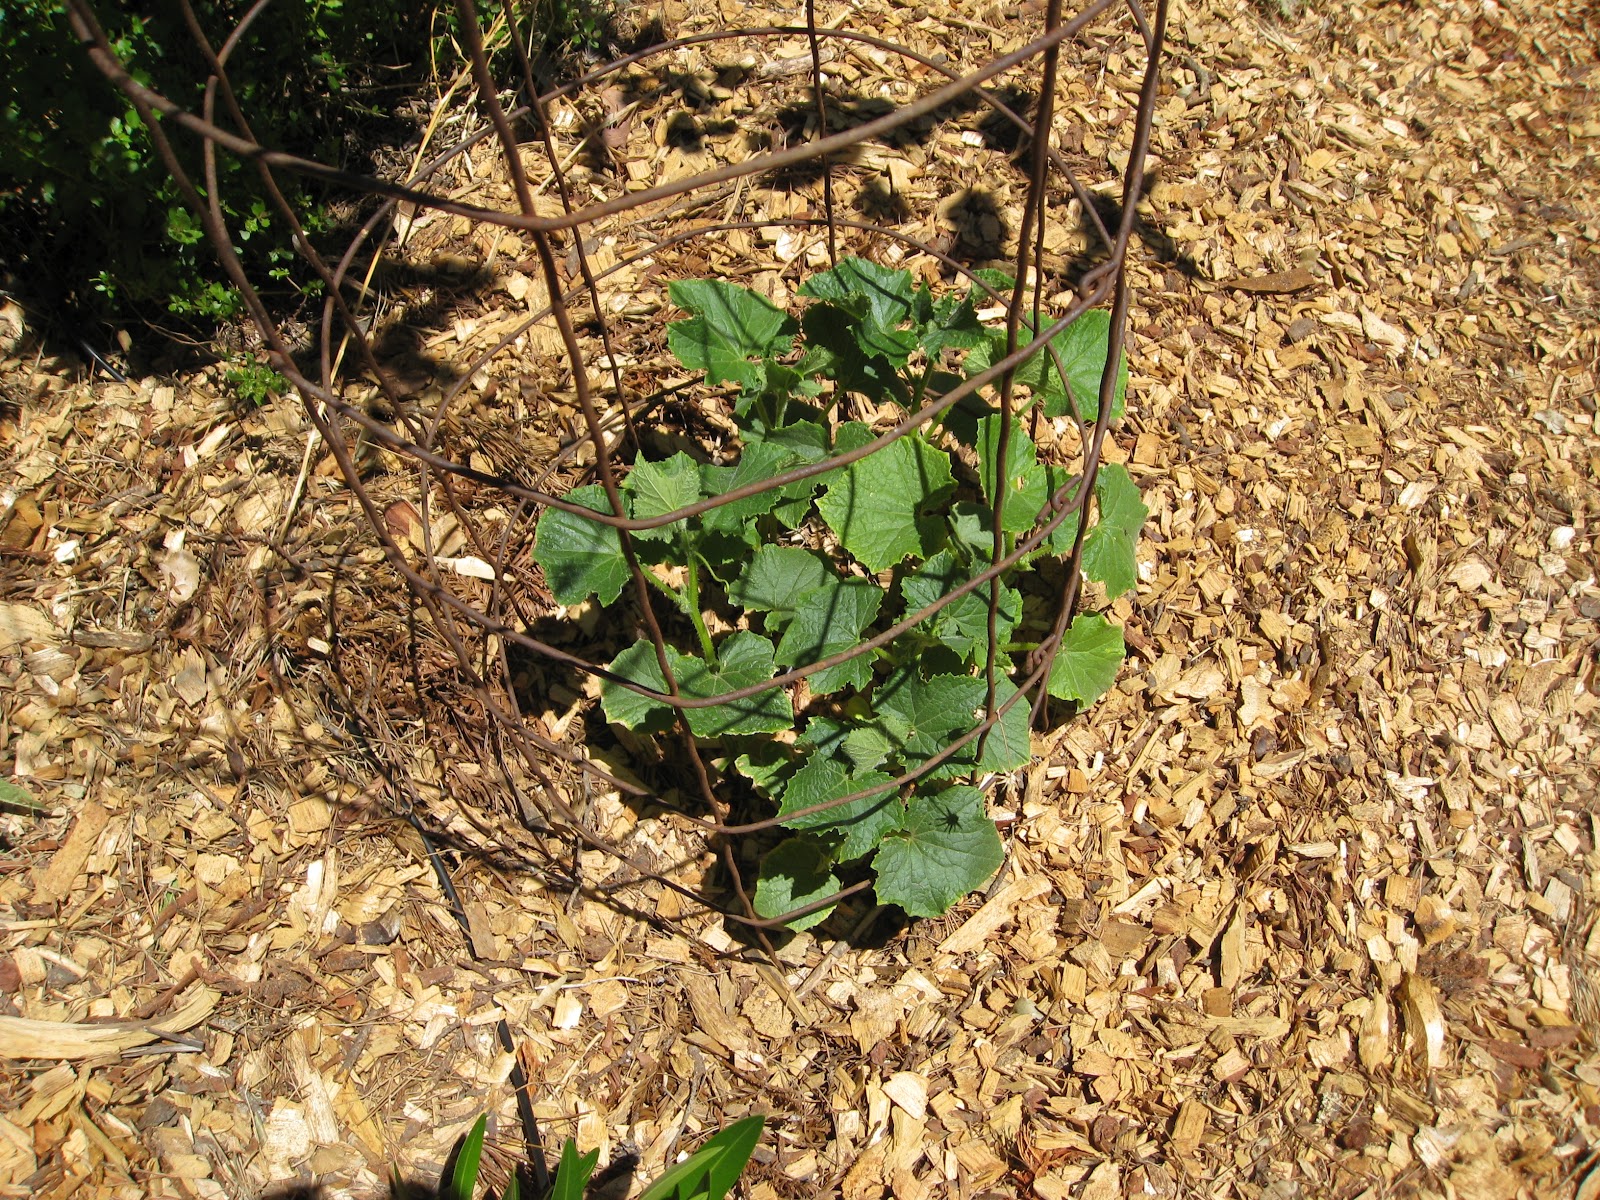
Here's the non-wilting, stumphole cukes today, doing nicely. A fair amount of liquid organic fertilizer had been added to green-up the leaves.


Please post some comments here if you've tried or seen something similar. Seeing this result is my reason for starting this blog and I'd like to learn as much about it to help out my own "low-cost garden".

Happy gardening!


Hugelkultur works!

This 4th year of my vegetable garden, I got inspired after reading about Hugelkultur and decided to give it a try.

Here are links to this info:
http://www.richsoil.com/hugelkultur/
http://www.permies.com/forums/f-2/permaculture  (search for 'hugelkultur, many discussions)

I dug 3 beds each only about 4'x4' to a depth of ~1.5' and then added lots of wood in, layering it up with dirt.


I used local leaves and pine needles as mulch and then watched the film "Back to Eden", got inspired and added about 2" of wood chip mulch to my entire garden & fruit tree area.

No compost was added to these beds, only logs, leaf mulch layer, than a top woodchip mulch layer.
For one bed I did add purchased organic fertilizer. The other beds I only added my own home-prepared liquid organic fertilizer (another post). All the beds are doing great.

It is the first year my garden in this spot has been a success! Now producing way more squash than several families can eat. Tomatoes and cukes just starting to ripen.

Only planted squash on top of the hugelkultur beds.  But did plants some tomatos next to the beds and some tomatos away from the hugelkultur beds.  The tomato plants close to the hugelkultur beds are doing much, much better than the other ones just planted in freshly dug clay (with the leaf and woodchip mulch).